Instructions For Adding Your Shows To The BACHA Shared Calendar
updated February 2, 2025
Welcome to the BACHA calendar. Like the BACHA website, this calendar is based on WordPress. It aims to be useful for music fans, easy for the venues to manage, and practical for BACHA personnel to support.
 Managing Your WordPress Account
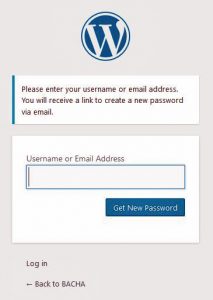
The webmaster has created a BACHA WordPress account for each member venue. Each WordPress account is associaetd with an email address for the venue. Before you can begin entering events, you must set a password for your account. Please save your venue’s username. If you lose the username or the email address or if you need to change the email address, ask the webmaster to help by sending an email to webmaster@bostoncoffeehouses.org. To set or change your password, visit https://bostoncoffeehouses.org/wp-admin and click “Lost your password?” in small lettering near the bottom of the form. A password reset page appears. It looks like this. Enter the venue username or the enmauil address into the Username or Email Address field and click the Get New Password button. WordPress will send a message ro the email address with a link that allows you to reset the password. Check your spam or junk folder if you don’t see the email.
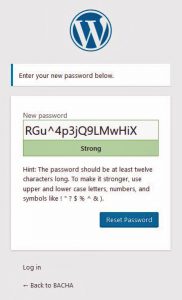 Clicking that link leads to a page like this. All public websites are under constant attack by evildoers, and the BACHA website is no exception. Consequently we havwe configured the website to require a strong password. Note the password strength indicator beneath the New Password field. It indicates that the password WordPress generated is considered a strong password. One very good way to manage your account is to accept the generated password and store it in a file, perhaps with your venue username. You can copy the password from this form and paste it into the file, and you can then copy it from teh file when you need it to log in. Be sure to save the file in a secure location on your computer, not in cloud storage such as Dropbox or Google Drive. If you prefer to enter a password that you can remember, you can type over the generated password. However, WordPress will not accept a password that is not Strong. There is a hint beneath the password strength indicator that provides some guidelines for strong passwords. It is easy to come up with strong passwords that are easy to remember. Try song lyrics or the first letters of the words of a phrase you remember. To make the password stronger, use substitutions. For instance, replace the word “for” with the number “4”, or the word “and” with the symbol “&”.
Entering Events
As you enter information about a concert, it is useful to keep in mind how it will appear on the shared calendar. The basic listing on the shared calendar page shows the date and time, the event title, the venue name and town, and the featured image. Clicking on a listing opens an event page for the concert. It shows the title, the image, a description, and a map that can provide directions. It also contains contact information and a detail link that may lead to a concert page on your website or to a ticketing page.
To enter a concert:
Login to WordPress
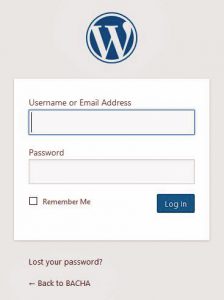 Visit https://bostoncoffeehouses.org/wp-admin. A page like this appears:
Enter the venue username and password. If you saved these in a file, you could copy them from the file and paste them into the form.
 Add Event
A page appears that has this menu in the upper left. Click Events, and then click Add New.
 A page with a form like the one to the right appears. Enter the name of the concert where it says Add title. Use a format like Garnet Rogers with Shawna Caspi opening or, for a co-bill, Connor Garvey and Putnam Smith. In general, you should not include the venue name. WordPress will fill this in. If your organization presents concerts at more than one venue, it may be wise to include the organizer nane, e.g. Peterborough Folk Music presents Ellis Paul. WordPress would then add @ Bass Hall.
Enter a description for the concert in the text field. The first sentence should describe the ticket price, e.g. Advance tickets are $12. The suggested contribution at the door is $15 for adults, $5 for juniors, and $30 for families. Note that the toolbar across the top allows you to format text and include links and images. There is a standard place to provide a link for tickets and/or more information, but it is a little obscure. You may wish to add a link in the description instead.
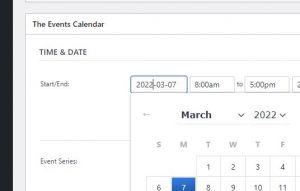 Scroll down to the TIME & DATE section and click the date next to Start/End. A date picker like the one to the right appears. Use the left and right-facing arrows next to the month and year to navigate between months and click the day of the concert. Click the time to the right of the date and select the start time, scrolling up or down as necessary. Repeat the process for the to date and time.
Scroll down again to the LOCATION section, click Find a Venue, and select a venue. Your venue should be listed beneath My Venues. Leave the boxes next to Show Map and Show Map Link checked. If you are holding concerts at an alternate location and would like to list a different venue, contact the webmaster by sending an email to webmaster@bostoncoffeehouses.org.
Scroll down again to the ORGANIZERS section, click Find an Organizer, and select an organization. Your organization should be listed beneath My Organizations.
Scroll down again to the EVENT WEBSITE section, click example.com next to URL:, and enter a web address that will appear in the detail section of your listing. This can be a link to a concert page on your website, a ticketing link, etc.
Scroll down one more time to the EVENT COST section. If tickets for your concert have only one price, you may wish to enter it here. If there are different prices for children or for tickets bought in advance, you may wish to leave this empty and describe the cost in the description. If the concert is free, enter 0 in this field.
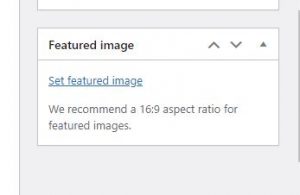 Look for the Featured Image section on the right. Click Set Featured Image to set an image for the concert. Note that images should ideally have an aspect ratio of 16:9, but 3:2 is acceptable too. The image will be shown 360px wide on the event page and scalled smaller for other uses. Image dimensions of 480px by 270px, 360px by 240px, and 600px by 400px work well. You can upload an image from your computer or select one already in the media library.
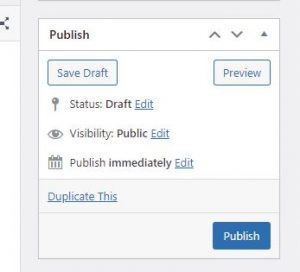 Scroll back up to the Publish section on the right. If you are ready to list your concert, click the blue Publish button. If you want to come back to it later, click the Save Draft button.
 Edit Event
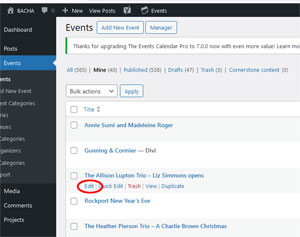
To change an event you have already entered, click Events in the menu on the left, and then click Events in the sub0menu that appears. Hover over the name of the event you want to change, and another sub-menu appears beneath the name. Click Edit (circled in red) and you will be back in the page you used to add the event. Make the desired changes and click the blue Update button. If the sub-menu does not include Edit, contact the webmaster.
Troubleshooting
This section addresses some of the problems that users have encuo0ntered when using the calendar.
 Skinny Event Titles
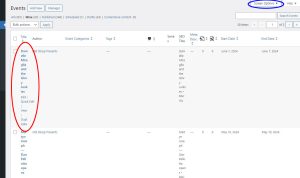
By default, the Events list shows so many columns that the Title column is very narrow, making it hard to read (circled in red). The WordPress plugin we use for Events is very flexible. We use only a few of its features, and most of these columns are unnecessary. It is easy to fix this. Click Screen Options in the upper right (circled in blue) and clear all the check boxes except Author and Start Date.
 Missing Sections
When you add a new event or edit an existing one, you use the event editor page. This page is divided into panels. Each panel can be minimized to get it out of the way if it is not needed. But it is easy to accidentally minimize a panel you need. The image to the right shows The Events Calendar panel (which we need) minized. To expand it, click the little downward-facing triangle to the right of the panel title (circled in blue).
When a panel is expanded, the little triangle to the right of the panel title faces upward, and you can minimize a panel by clicking the triangle. We use only a few of the sections, and you can safely minimze sections Divi Page Settings, Tags, Event Categories, Event Options, and Series to make the page easier to navigate.
The event editor page has two main sections: a wide “main” section in the center and a narrower one to the right. Panels can be dragged up and down in a section or even dragged between sections. If you can’t find a panel you need, look for its title in both sections and drag and expand it as necessary.
